SEO for images involves optimizing visual content to enhance visibility in Google search and improve user experience. This practice is essential in the digital landscape, where images play a crucial role in engaging users and conveying information quickly.
Significance in the Digital Landscape
Images significantly impact both user engagement and search engine rankings. Well-optimized images can:
Enhance page load speed
Improve accessibility for visually impaired users
Boost search engine rankings by providing context to search engines
Impact on User Experience and Search Rankings
Optimized images contribute to a seamless browsing experience by ensuring fast load times and relevant visual content. This not only keeps visitors engaged but also reduces bounce rates, which positively influences search rankings.
Key Image SEO Elements
Key elements of image SEO include:
Descriptive filenames: Use relevant keywords to name your image files.
Alt text: Provide clear, concise descriptions for images.
Image formats: Choose appropriate file types like JPEG or PNG based on the image’s purpose.
Responsive images: Implement techniques like srcset for different screen sizes.
Structured data markup: Help search engines understand image content better.
Optimizing these elements helps ensure that your images not only look great but also perform well in Google search results. Additionally, it’s crucial to optimize images for SEO to enhance search engine friendliness and improve user experience.
Understanding Image SEO
Image SEO involves various strategies to help search engines interpret and rank images effectively. When search engine crawlers encounter an image, they rely on surrounding text, file names, alt text, and other attributes to understand its content.
How Search Engines Interpret Images
Search engines like Google use a combination of:
Alt Text: Provides a textual description for the image.
File Names: Descriptive names help indicate the image’s subject.
Surrounding Text: Contextual information from the webpage.
Structured Data: Additional metadata that helps define the image.
Ranking Images in Search Results
Google ranks images based on relevance and quality. Factors include:
Relevance to Search Query: How well the image content matches user intent.
Page Authority: Trustworthiness of the hosting page.
Engagement Metrics: User interactions such as clicks and views.
Visual Search Optimization
Google Lens and Google Images enhance how users interact with visual content. Users can:
Search by Image: Find similar images or related information.
Discover Products: Identify items and their details via visual search.
Benefits of Optimizing Images for Search
Optimized images contribute to:
Improved Visibility: Higher chances of appearing in image search results.
Enhanced User Experience: Faster load times and accessible content.
Increased Traffic: More clicks through appealing and relevant visuals.
Key Factors Influencing Image SEO
Several key elements impact image SEO effectiveness:
Alt Text Quality
Descriptive File Names
Optimized Image Size
Proper Use of Structured Data
Relevant Surrounding Content
Optimize Images: Ensure images are properly compressed and resized for faster load times and better SEO performance.
Understanding these aspects ensures your images are easily discoverable by search engines and engaging for users.
Enhancing Accessibility with Alt Text and Image Descriptions
Purpose and Importance of Alt Text
Alt text, or alternative text, serves multiple critical functions on a website. Primarily, it ensures website accessibility for visually impaired users who rely on screen readers to interpret content. By providing a textual description of an image, alt text allows these users to understand the context and purpose of the image.
Alt text also plays a significant role in SEO. Search engines use this text to index images accurately, improving the likelihood of your images appearing in relevant search results. Missing alt text can result in missed opportunities for both accessibility and SEO.
Best Practices for Writing Effective Alt Text
Creating effective alt text involves more than just describing the image. Here are key guidelines:
Be Descriptive but Concise: Aim for 10-15 words that accurately describe the image’s content and context.
Include Relevant Keywords: Integrate relevant keywords naturally to improve SEO without keyword stuffing.
Avoid Redundancy: Don’t repeat information already provided in the surrounding text.
Skip “Image of” Phrases: Screen readers already identify the presence of an image, so phrases like “image of” or “picture of” are unnecessary.
Example:
Consider an image of a golden retriever puppy playing with a red ball in a grassy park.

Poor alt text: “Image of a dog”
Better alt text: “Golden retriever puppy chasing red ball in sunny park”
This example demonstrates the principles outlined:
- It’s descriptive but concise, using 8 words to paint a clear picture.
- It includes relevant keywords (golden retriever, puppy, park) that could be useful for SEO.
- It doesn’t repeat information that might already be in the surrounding text (assuming the article isn’t explicitly about this specific image).
- It skips phrases like “Image of” or “Picture of”, getting straight to the description.
This example helps illustrate how to apply the guidelines in a practical scenario, showing the difference between vague, unhelpful alt text and more effective, descriptive alt text that follows the best practices.
Using Image Descriptions for Enhanced Accessibility
Beyond alt text, detailed image descriptions can further enhance accessibility. These are particularly useful for complex images like graphs, charts, or infographics.
Provide Detailed Information: Explain all elements within the image.
Use Captions When Necessary: Captions can serve as extended descriptions to offer more context.
Cite Image Sources: Ensure proper image source citation to credit original creators and provide additional context.
By adhering to these practices, you not only improve your site’s compliance with accessibility standards but also enhance user experience and SEO potential.
Example:
Image: A red apple on a wooden table.
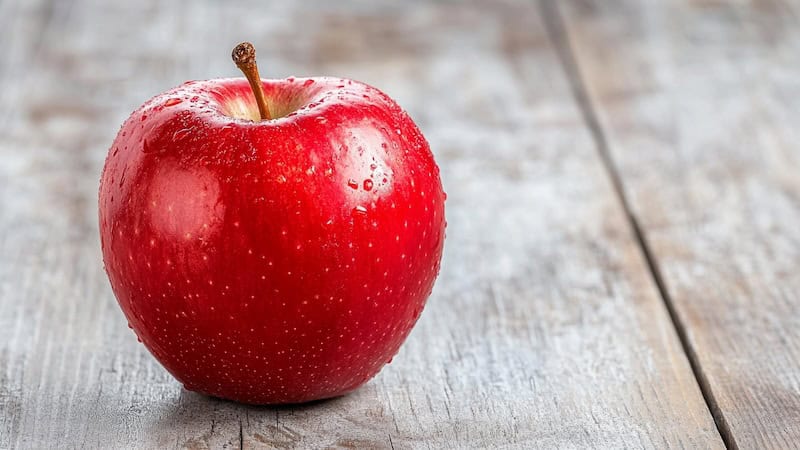
Alt text: “Red apple on wooden table”
Extended image description: “A bright red apple sits in the center of a light brown wooden table. The apple’s stem is visible, and there’s a small leaf attached to it.”
Caption: “Figure 1: Fresh apple ready for consumption”
Image source: “Photo by Jane Smith, 2024”
Optimizing File Names and URL Structure
Importance of Descriptive, Keyword-Rich File Names
Using descriptive, keyword-rich file names for images significantly enhances SEO. Search engines rely on text to understand and index content, so a well-chosen file name can provide valuable context about the image.
Example: Instead of naming an image IMG1234.jpg, use a more descriptive name like golden-retriever-playing-in-park.jpg.
Best Practices for Image File Names
To optimize image file names effectively:
Be Descriptive: Clearly describe the content of the image.
Include Keywords: Incorporate relevant keywords naturally.
Use Hyphens: Separate words with hyphens (-) rather than underscores (_).
Keep It Short: Aim for concise yet informative names.
Example:

Poor file name: DSC1234.jpg
Better file name: blue-butterfly-flower.jpg
This example demonstrates the principles outlined:
- It’s descriptive, clearly indicating what the image contains (a blue butterfly on a flower).
- It includes relevant keywords (blue, butterfly, flower) that could be useful for SEO.
- It uses hyphens to separate words, which is preferred by search engines.
- It’s concise (3 words, 22 characters) while still being informative.
This file name provides immediate information about the image content and follows SEO best practices, unlike the generic, non-descriptive original file name.
Scenarios Where Image URL Structure is Important
The URL structure of an image can influence how search engines and users perceive the content. A clean, logical URL structure helps in better indexing and ranking. Properly structured image URLs can improve indexing and search visibility.
Best Practices for Image URL Structure
Consistent Naming Conventions: Maintain uniformity across your website.
Include Relevant Keywords: Reflect the image content within the URL path.
Avoid Special Characters: Stick to alphanumeric characters and hyphens.
Example:
https://www.example.com/images/blog/sunset-over-rocky-mountains.jpg
This URL is cleaner and provides context compared to a generic path like:
https://www.example.com/uploads/image1.jpg
Avoiding Common File Naming Mistakes
Common mistakes can undermine your SEO efforts. Avoid these pitfalls:
Generic Names: Avoid non-descriptive names like image1.jpg.
Keyword Stuffing: Overloading file names with keywords can be counterproductive.
Special Characters: Refrain from using characters like %, &, or spaces.
Adhering to these practices ensures that your images are properly indexed and ranked by search engines, ultimately enhancing visibility and user experience.
Example:
Poor file name: blue butterfly on flower.jpg
Better file name: blue-morpho-hibiscus.jpg
This example demonstrates:
- Avoiding spaces (a special character) by using hyphens instead
- Being more specific (“morpho” instead of generic “butterfly”)
- Keeping it concise while still descriptive
- Using relevant keywords without stuffing
The improved filename is more SEO-friendly and easier for both users and search engines to interpret.
Choosing the Right Image Formats
Selecting the appropriate image format is crucial for balancing quality, file size, and performance. Each format has its strengths and ideal use cases.
Comparison of JPEG, PNG, WebP, and SVG Formats
| Format | Strengths | Ideal Use Cases |
|---|---|---|
| JPEG | Best for photographs and images with many colours. Offers good compression but can lose quality with high compression levels. | Photos, complex images with gradients and many colours |
| PNG | Ideal for images requiring transparency or when maintaining crisp edges is essential (e.g., logos). Larger file sizes compared to JPEG due to lossless compression. | Transparent images, simple graphics like icons |
| WebP | Developed by Google, this format provides superior compression rates while retaining image quality. Suitable for both photographic and graphical images. | Both photographs and graphics where you need smaller file sizes without compromising quality |
| SVG | Vector-based format perfect for icons, logos, and illustrations that require scalability without loss of quality. | Scalable graphics such as logos and icons, images that need to be resized frequently without losing quality |
Balancing Quality and File Size
Balancing image quality with file size is vital for optimizing performance:
JPEG offers adjustable compression levels; opt for a balance between quality (usually around 70% compression) and size.
PNG should be used sparingly due to larger sizes but ensures no loss in quality.
WebP provides an excellent balance as it maintains high quality at reduced file sizes.
SVGs, being vector-based, are typically small in size but maintain perfect clarity at any resolution.
Performance (Speed) Comparison of Using Each File Type
When it comes to page load speed:
JPEGs generally load faster than PNGs due to smaller file sizes.
PNGs, while larger, are essential for specific use cases like transparency.
WebPs often load the fastest due to their superior compression capabilities.
SVGs, being text-based, usually have minimal impact on loading times.
File Size Comparison of Using Each File Type
To illustrate file size differences:
A 100KB JPEG might convert to a:
300KB PNG (due to lossless nature)
60KB WebP (thanks to efficient compression)
An SVG might remain extremely small (e.g., <10KB) regardless of complexity since it scales perfectly at any resolution.
Choosing the right image format involves understanding the specific needs of your content while considering both performance and visual experience.
Image Optimization Techniques
Optimizing images is crucial to ensure a balance between visual appeal and website performance. This section delves into various techniques for resizing images, compressing them, and optimizing metadata to enhance their web usability.
Resizing Images for Web Use
Resizing images to the appropriate image dimensions ensures they fit within the designated space on a webpage without wasting bandwidth. Large images can significantly slow down page load times, impacting user experience and search engine rankings.
1. Determine appropriate dimensions
Identify the maximum display size required for your images. Tools like Adobe Photoshop or GIMP can help resize images without compromising quality.
2. Maintain aspect ratio
Ensure the original ratio of width to height is preserved to avoid distortion.
Compression Methods and Their Impact on Quality
Compressing images reduces file size while maintaining acceptable quality levels. There are two main types of image compression:
1. Lossy Compression
This method reduces file size by permanently removing some data, which might slightly degrade image quality. JPEG format typically uses lossy compression.
2. Lossless Compression
This method reduces file size without losing any data, preserving the original image quality. PNG format often employs lossless compression.
Metadata Optimization for Images
Metadata provides additional information about an image, such as the title, description, and keywords, which are useful for search engines and accessibility tools.
1. Title
Use concise, keyword-rich titles that accurately describe the image.
2. Description
Write detailed descriptions that provide context and relevance.
3. Keywords
Include relevant keywords to enhance searchability.
Tools for Image Resizing and File Size Reduction
Several tools can assist in resizing and compressing images effectively:
Online Tools
ShortPixel
EWWW Image Optimizer
Smush
TinyPNG
Desktop Applications
ImageOptim (Mac only)
RIOT (Windows)
ImageMagick (Windows, Mac, Linux)
Features to Look For in Optimization Software
When selecting an image optimization tool, consider the following features:
Ease of Use: User-friendly interface with straightforward instructions.
Batch Processing: Ability to process multiple images simultaneously.
Compression Options: Both lossy and lossless compression choices.
Integration Capabilities: Compatibility with popular CMS platforms like WordPress.
Customization Options: Control over the degree of compression applied.
Comparison of Online vs Desktop Optimization Tools
Online tools offer convenience and ease of access, while desktop applications provide greater control and efficiency, especially when dealing with large volumes of images.
By implementing these optimization techniques, you can ensure your website remains visually appealing while delivering optimal performance across various devices and platforms.
Improving Page Load Speed with Optimized Images
Understanding the Impact of Image Size on Page Load Speed
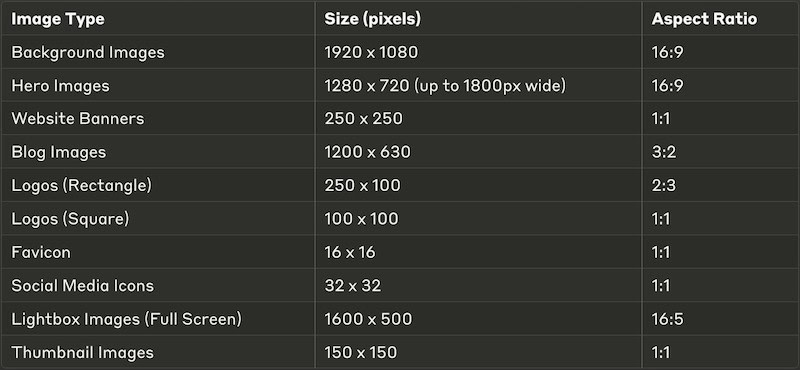
Images play a significant role in determining how fast a webpage loads. When you have larger image files, they take longer to download, which can negatively affect the overall experience for users visiting your site. If your pages are slow to load, it can lead to more people leaving without interacting (higher bounce rates) and lower rankings on search engine results.
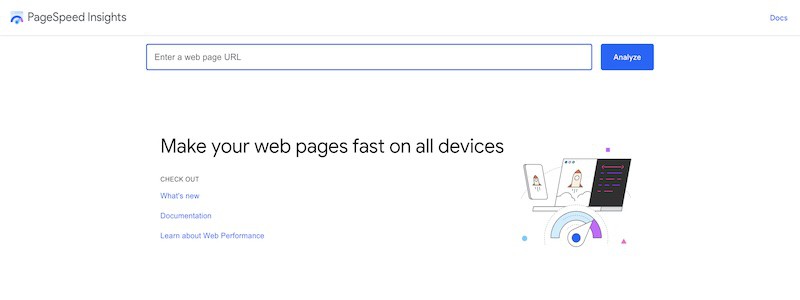
To identify if large images are impacting your site’s performance, you can use tools like Google PageSpeed Insights.
Techniques for Reducing Image File Sizes
It’s important to reduce image file sizes without sacrificing quality. Here are some techniques you can use:
Resizing: Adjust the dimensions of your images to match how they will be displayed on your website.
Compression: Use lossless or lossy compression methods to decrease file sizes. Tools like JPEGmini or ImageOptim can help with this.
File Formats: Choose appropriate file formats for your images. Use JPEG for photographs, PNG for images that require transparency, and WebP for smaller file sizes without loss of quality.
Implementing Lazy Loading for Images
Lazy loading is a technique that can improve page load speeds by delaying the loading of images that are not currently visible on the screen. Instead of loading all images at once when someone visits a page, lazy loading ensures that only the images within the user’s viewport (the visible area of the webpage) are loaded initially.
This approach reduces the time it takes for a page to load because fewer resources need to be fetched right away. As users scroll down and more images come into view, those off-screen images will then be loaded as needed.
WordPress Tools That Help With Lazy Loading
If you’re using WordPress, there are several plugins available that can automate the process of lazy loading:
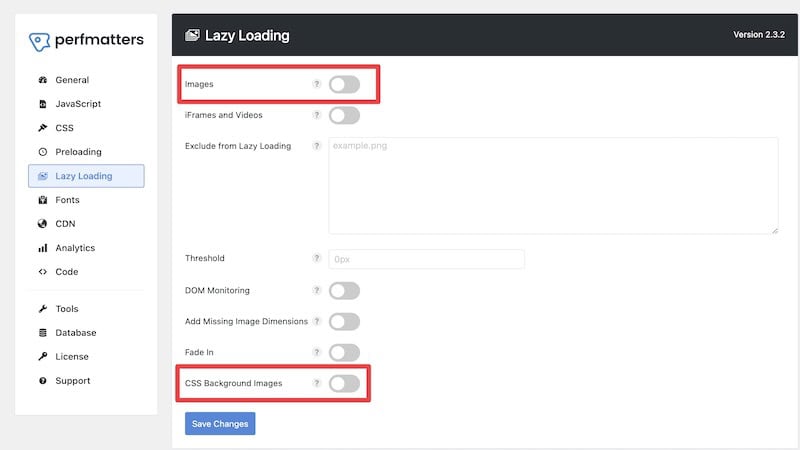
Perfmatters: This lightweight plugin allows you to enable lazy loading along with other performance enhancements.
WP Rocket: A comprehensive caching plugin that includes lazy loading as one of its features.
By integrating these tools into your WordPress site, you can easily implement lazy loading without requiring extensive technical knowledge. Both plugins provide user-friendly interfaces that make it simple to configure and manage lazy loading settings.
Benefits of Optimizing Images for Page Speed
By focusing on optimizing your images through techniques like resizing, compression, and lazy loading, you not only enhance the user experience on your site but also improve its visibility in search engine results.
When pages load quickly and efficiently, visitors are more likely to stay longer, explore more content, and engage with your website. Additionally, search engines prioritize fast-loading sites when ranking results, which can lead to higher organic traffic over time.
Responsive Images and Mobile Optimization
Optimizing images for various devices ensures a seamless user experience and improves SEO. Implementing responsive images involves using HTML and CSS techniques to adapt image displays based on device characteristics.
Using srcset and sizes Attributes
HTML’s srcset attribute allows you to specify multiple image sources for different screen resolutions:
html
srcset: Defines the available image versions and their width descriptors.
sizes: Specifies how much space the image should take up based on viewport conditions.
Creating and Implementing Responsive Image Breakpoints
Responsive breakpoints ensure images are displayed optimally across different devices. Here’s an example of CSS to handle breakpoints:
css .responsive-image { width: 100%; height: auto; }
@media (min-width: 768px) { .responsive-image { width: 50%; } }
This CSS snippet ensures:
Images take up the full width of smaller screens.
On larger screens (e.g., tablets or desktops), images occupy only half the width.
Mobile-First Approach to Image Optimization
A mobile-first strategy prioritizes the optimization of images responsive to smaller devices before scaling up:
Start with Small Images:
Use lower resolution images for mobile devices.
Load higher resolution images only when necessary.
Use Modern Formats:
WebP offers superior compression with high quality, ideal for mobile optimization.
Lazy Loading:
Implement lazy loading to defer off-screen image loading until they’re needed. This reduces initial page load time significantly.
Enhancing Image Visibility with Structured Data Markup
Types of Structured Data Relevant to Images
Structured data helps search engines understand the content and context of images on your website. Key types of structured data relevant to images include:
ImageObject: Provides general information about the image.
Product: Used for product pages, includes details like price, availability, and image.
Recipe: Specific to recipes, includes ingredients, cooking time, and images.
Article: Adds context to articles, including author information and images.
Implementing Schema.org Markup for Images
Schema.org markup is a standardized format that allows you to provide detailed information about your images. When implemented correctly, it can enhance the visibility of your images in Google snippets and Google Images.
Step-by-Step Guide to Write Image Markup
Choose the Right Schema Type:
Identify the appropriate schema type for your content (e.g., ImageObject, Product, Recipe). For images, we’re using the ImageObject schema.
Add JSON-LD Schema Code:
Use JSON-LD (JavaScript Object Notation for Linked Data) format as it’s recommended by Google.
- Currently do not have any recommendation for a specialist free tool that you can use to help you write the JSON-LD schema. This is because most of the free schema markup generator tool we explored doesn’t support the ImageObject schema. At least not the free version. However, you can prompt ChatGPT to assist.
- Validate the Markup
- Use a free Schema Markup Validator to ensure the generated JSON-LD schema is error free. Fix any error manually or prompt ChatGPT to correct the issue with the error given by the Markup Validator, otherwise, Google won’t be able to understand it.
Insert Markup Into HTML:
Place the JSON-LD script within the <head> section or at the end of the <body> tag.
- Publish the page.
Example:
We have an image featuring two ducks swimming in a pond.
- Go to chat.openai.com and use the following prompt. Replace the details of the image accordingly.
Write a JSON-LD schema for an image with the following information:
Image URL: http://example.com/image.jpg
Creator: John Doe
Date create: 2024-08-01
Description: Two ducks swimming in a pond
The generated JSON-LD schema should look like this
    <script type="application/ld+json">
    {
      "@context": "http://schema.org",
      "@type": "ImageObject",
      "contentUrl": "http://example.com/two-ducks-in-a-pond.jpg",
      "creator": {
        "@type": "Person",
        "name": "John Doe"
      },
      "datePublished": "2024-08-01",
      "description": "Two ducks swimming in a pond."
    }
</script>- Validate the schema at https://validator.schema.org/
- Copy the code to the header section of the page you where the image is shown. Example of the code as below:
<!DOCTYPE html>
<html lang="en">
<head>
    <meta charset="UTF-8">
    <meta name="viewport" content="width=device-width, initial-scale=1.0">
    <title>Example Page</title>
    <script type="application/ld+json">
    {
      "@context": "http://schema.org",
      "@type": "ImageObject",
      "contentUrl": "http://example.com/two-ducks-in-a-pond.jpg",
      "creator": {
        "@type": "Person",
        "name": "John Doe"
      },
      "datePublished": "2024-08-01",
      "description": "Two ducks swimming in a pond."
    }
    </script>
</head>
<body>
    <h1>Welcome to My Website</h1>
    <img src="http://example.com/two-ducks-in-a-pond.jpg" alt="Two ducks swimming in a pond.">
</body>
</html>
Benefits of Structured Data for Image Search Results
Implementing structured data for images provides several benefits:
Enhanced Visibility: Increases the likelihood of your images appearing in rich snippets and Google Images search results.
Improved Click-through Rates (CTR): Rich snippets often attract more clicks due to their enhanced appearance.
Better User Experience: Provides users with more detailed information directly in search results.
By effectively using structured data, you can significantly boost the SEO performance of your images, making them more discoverable and engaging for users.
Utilizing XML Image Sitemaps for Better Indexing Control
Creating an XML Sitemap Specifically for Images
An XML image sitemap is a powerful tool to enhance the discoverability of images on your website. Unlike standard sitemaps, these are tailored to provide search engines with metadata about the images on your site, ensuring they are indexed correctly.
Essential Elements to Include in Image Sitemaps
When constructing an XML image sitemap, certain elements are crucial:
<loc>: Specifies the URL of the webpage that contains the image.
<image:image>: Indicates the start of an image entry.
<image:loc>: URL of the actual image file.
<image:title>: Title of the image, providing additional context.
<image:caption>: A brief description or caption for the image.
<image:geo_location>: Geographic location information relevant to the image.
Submitting and Updating Image Sitemaps on Google Search Index
Submitting your XML image sitemap to Google Search Index ensures that Google can effectively crawl and index your images. Follow these steps:
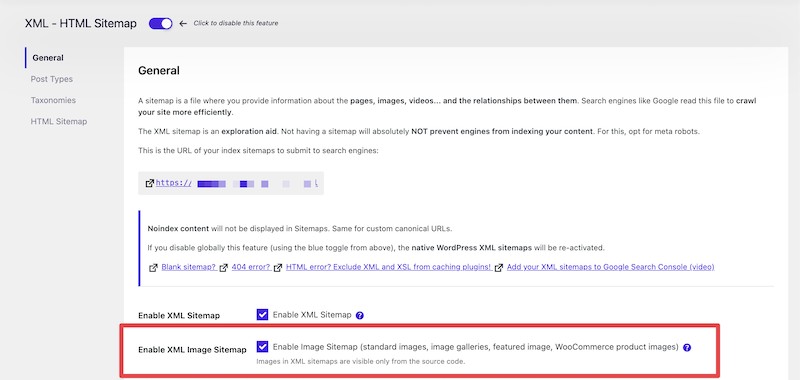
- Generate your XML image sitemap using tools like SeoPress plugin (for WordPress websites) or manually create it following Google’s guidelines.
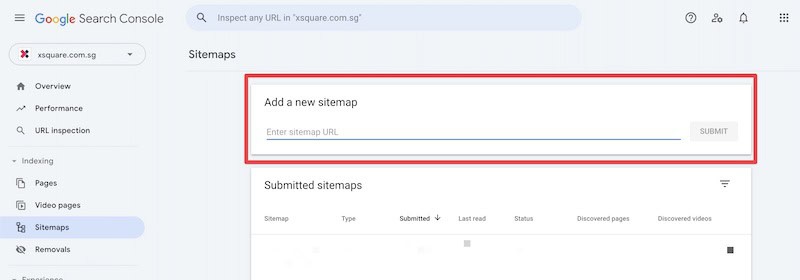
- Access Google Search Console and navigate to the ‘Sitemaps’ section.
Submit your sitemap URL, typically http://www.example.com/sitemap_images.xml.
You just need to do this once.
When It Is Important to Use Image Sitemaps
Utilizing an XML image sitemap is particularly beneficial in several scenarios:
- Large websites with extensive media libraries: Ensures all images are indexed effectively.
- Sites with dynamically generated content: Helps search engines keep up with frequent changes.
- E-commerce platforms with product galleries: Enhances the visibility of product images in search results.
By strategically implementing XML image sitemaps, you can significantly improve how search engines index and present your site’s imagery, giving you an edge in both visibility and user experience.
The Role of Captions in Image SEO Strategy
SEO Benefits of Using Image Captions
Image captions play a vital role in enhancing the SEO performance of a website. They provide context to images, making them more understandable for both users and search engines. Captions can:
Increase user engagement by providing additional information about the image.
Enhance the relevance and context of the surrounding content.
Improve the chances of appearing in image search results.
Example: An article about hiking may include an image caption like “A hiker enjoying a sunrise view from the summit of Mount Kilimanjaro” instead of a generic caption like “Beautiful view”.
Best Practices for Writing SEO-Friendly Captions
To maximize the benefits of image captions, consider these best practices:
Be Descriptive and Relevant: Ensure that your captions accurately describe the image content and its relevance to the article.
Example: For an image showing a group of kayakers, a good caption might be “Group of kayakers navigating through river rapids in Colorado”.
Include Keywords Naturally: Incorporate keywords naturally within the captions without keyword stuffing.
Example: If your target keyword is “wildlife photography,” you might write “Capturing stunning wildlife photography in Africa’s national parks”.
Keep It Concise: While being descriptive, keep your captions concise and to the point, ideally under 125 characters.
Enhance Readability: Use simple language and proper punctuation for readability.
Balancing User Experience and SEO in Caption Writing
While optimizing captions for SEO, maintaining a balance with user experience is crucial:
Avoid Overloading with Keywords: Focus on natural language that enhances reader comprehension rather than stuffing keywords.
Contextual Relevance: Ensure that captions add value to the reader’s understanding of the content. A well-crafted caption can make an image more engaging and informative.
Visual Appeal: Make sure captions are aesthetically pleasing and easy to read by choosing appropriate font sizes and styles.
WordPress Plugins for Automatic Alt Text and Captions
Several WordPress plugins can help automate alt text and caption generation, streamlining the process:
- ALTText.AI
- Automatically generate alt text for images in over 130 languages.
- Improve Image SEO and site accessibility.
Automatically adds alt text based on predefined templates.
Generates captions using custom rules.
Enhances images with SEO-friendly attributes.
Supports bulk editing for large media libraries.
Integrating these plugins into your WordPress site can save time, ensure consistency, and enhance your overall image SEO strategy without manual intervention.
By following these guidelines, you can effectively leverage image captions to boost your site’s SEO performance while providing valuable context for users.
Optimizing for Image Search and SERP Snippets
Understanding Google Images Search Algorithm
Google Images operates differently from traditional web search. The algorithm evaluates a variety of factors to determine the relevance and quality of images:
Image Content: Google analyzes the actual content within an image using advanced machine learning techniques.
Metadata: Alt text, file names, titles, and surrounding text impact image ranking.
Page Context: The overall relevance of the page where the image is embedded also plays a role.
Techniques for Appearing in Image SERP Features
To enhance your chances of appearing in Google’s Image SERP features:
High-Quality Images: Use high-resolution images without excessive compression artifacts.
Relevant Alt Text: Ensure alt text is descriptive and keyword-rich but avoid keyword stuffing.
Descriptive File Names: Use concise, informative file names that include relevant keywords.
Structured Data Markup: Implement schema.org markup to provide additional context to search engines.
Optimizing for Visual Search
Visual search technology like Google Lens allows users to search using images rather than text. To optimize for visual search:
Unique, Original Images: Stock photos are less likely to perform well. Use unique images that represent your content accurately.
Consistent Branding: Ensure your brand’s logo and color schemes are visible in your images when appropriate.
Image Sitemaps: Include all significant images in your XML sitemap to improve discoverability.
Step-by-Step Guide on Using Ahrefs to Find Image Snippet Opportunity
Ahrefs can be a valuable tool for identifying opportunities for image snippets:
Keyword Research:
Open Ahrefs’ Keywords Explorer.
Enter relevant keywords related to your niche.
SERP Analysis:
Check the “SERP Overview” for each keyword.
Look for keywords that have an “Images” box in their search results.
Content Gap Analysis:
Use the “Content Gap” tool under the “Site Explorer.”
Identify where competitors rank in image searches that you don’t.
Optimize Your Images:
Improve alt texts, file names, and image quality based on findings.
Add structured data markup where applicable.
Monitor Performance
Track changes in rankings using Ahrefs’ Rank Tracker.
Adjust strategies based on performance metrics.
Example: If you’re targeting the keyword “sustainable fashion,” use Ahrefs to identify top pages with image snippets and then optimize your own images accordingly by naming them sustainable-fashion.jpg, adding detailed alt texts like “eco-friendly sustainable fashion dress”, and ensuring high quality with fast loading times.
By taking these steps, you can improve your presence in both traditional and visual search results, driving more organic traffic to your site through enhanced image SEO.
Creating Unique Content with High-Quality Original Images
Benefits of Original Images for SEO
Original images play a critical role in enhancing SEO. They help:
Improve Click-Through Rates (CTR): Unique visuals attract users’ attention, driving more clicks from search engine result pages (SERPs).
Increase Engagement: High-quality, original photos can keep users on your page longer, reducing bounce rates.
Build Trust and Credibility: Genuine images foster trust with your audience, unlike generic stock photos that can appear impersonal.
Enhance Brand Identity: Custom visuals align with your brand’s voice and messaging, making your content more recognizable.
Techniques for Creating Compelling Original Visuals
Creating unique and engaging visuals involves several techniques:
Invest in Quality Equipment: Good cameras and lighting setups can dramatically improve the quality of your photos.
Focus on Composition: Use the rule of thirds, leading lines, and other composition techniques to create visually appealing images.
Edit Professionally: Utilize photo editing software like Adobe Photoshop or Lightroom to enhance color balance, contrast, and sharpness.
Tell a Story: Ensure each image conveys a part of your brand story or complements the accompanying text. This makes visuals more meaningful to users.
Comparing Original Photos, Stock Photos, and AI-Generated Images
Understanding the differences between original photos, stock photos, and AI-generated images is essential for making informed decisions about visual content.
Original Photos
Pros: Authenticity, tailored to specific needs, can enhance branding.
Cons: Time-consuming to create; requires investment in equipment and skills.
Stock Photos
Pros: Easily accessible; wide variety of subjects; cost-effective in bulk.
Cons: Overused; may not match brand identity perfectly; less engaging.
AI-Generated Images
Pros: Customizable; rapidly produced; innovative for specific use-cases like product mock-ups.
Cons: Can lack authenticity; may not always integrate seamlessly with real-world contexts.
Data Comparison
Comparing these options quantitatively provides deeper insights:
| Type | Engagement Rate | Cost | Production Time |
|---|---|---|---|
| Original Photos | Highest | High | Long |
| Stock Photos | Moderate | Low to Moderate | Short |
| AI-Generated Images | Variable | Low | Short |
Data suggests that while original photos require more time and resources, they offer the highest engagement rates. Stock photos provide a quick and cost-effective solution but often fall short in user engagement. AI-generated images strike a balance but may need careful integration to achieve authenticity.
Creating unique content with high-quality original images not only boosts SEO but also enriches the user experience by delivering authentic visual narratives aligned with your brand’s values.
WordPress Plugins for Image SEO
Overview of Top Image SEO Plugins
When it comes to optimizing images on a WordPress site, several plugins can make the task easier and more efficient. Some of the top image SEO plugins include:
Smush: Known for its powerful image compression capabilities.
EWWW Image Optimizer: Offers both lossy and lossless compression options.
ShortPixel: Balances image quality and file size through advanced compression techniques.
Imagify: Provides various levels of image optimization, including aggressive compression.
- ALTText.AI: Automatically generate alt text for images in over 130 languages.
Features to Look For in Image SEO Plugins
Selecting the right plugin can significantly impact your site’s performance and user experience. Key features to consider:
Compression Options: Ability to choose between lossy and lossless compression.
Bulk Optimization: Optimize multiple images at once to save time.
Automatic Optimization: Automates the optimization process upon image upload.
Alt Text Generation: Automatically generates or suggests alt text based on predefined rules or AI.
Backup and Restore Options: Ensures original images are not lost during optimization.
Setting Up and Configuring Image SEO Plugins
To get the best results from your chosen plugin, proper setup and configuration are essential. Here’s a general guide:
Install the Plugin:
Navigate to Plugins > Add New in your WordPress dashboard.
Search for your desired plugin (e.g., Smush, EWWW Image Optimizer).
Click Install Now and then Activate.
Configure Settings:
Access the plugin settings from your dashboard (typically under Settings or a dedicated menu).
Adjust compression levels based on your needs (lossy or lossless).
Enable automatic optimization for new uploads.
Configure alt text generation settings if available.
Optimize Existing Images:
Use the bulk optimization feature to compress existing images in your media library.
Balancing Plugin Use with Manual Optimization Techniques
While plugins offer convenience, manual optimization should not be overlooked. Combining both methods ensures optimal results:
Manual File Naming: Before uploading, name files descriptively with relevant keywords.
Custom Alt Texts: Write specific alt texts that accurately describe each image, rather than relying solely on automated generation.
Image Sitemaps: Manually create and submit image sitemaps for better indexing control.
Image Optimization Plugins vs Caching Plugins
Image optimization plugins focus specifically on improving image file sizes and attributes, while caching plugins enhance overall site speed by storing static versions of pages. Both play crucial roles but serve different purposes:
Image Optimization Plugins:
Reduce file sizes for faster load times without compromising quality.
Manage alt text and metadata for improved SEO.
Caching Plugins:
Store cached versions of pages to reduce server load times (e.g., WP Rocket, W3 Total Cache).
Complement image optimization by speeding up page delivery as a whole.
Using both types of plugins in tandem ensures a comprehensive approach to site performance. Combining optimized images with effective caching strategies leads to faster loading times, enhanced user experience, and better search engine rankings.
By leveraging these tools effectively, you can significantly improve your website’s image SEO while maintaining high-quality visuals tailored for both desktop and mobile users.
Conclusion
Optimizing images is essential for improving website load times and overall user experience. Faster loading pages not only enhance user satisfaction but also positively impact search engine rankings.
One standout technique from this article is the use of alt text. Alt text serves multiple purposes: it makes your site more accessible, provides context to search engines, and can improve your chances of appearing in image search results.
Regularly auditing and updating your image SEO practices is key to keeping your content relevant and competitive. This includes:
Ensuring file names are descriptive and keyword-rich
Keeping up with the latest best practices for alt text
Employing modern image formats for optimal performance
By staying proactive in your approach to image SEO, you maintain a robust online presence that caters to both users and search engines alike.
Do reach out to us if you need consultation for your website’s SEO.